Monday, October 24, 2011
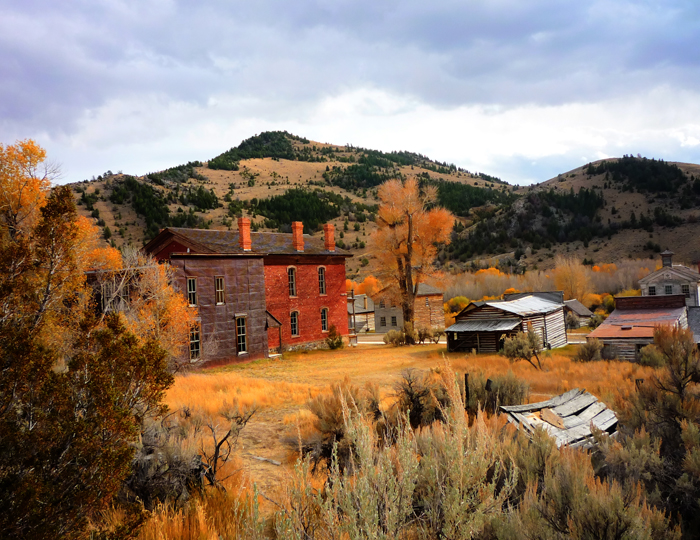
Week 6, HDR
1. School house: October 20, 2011, 3:38pm; Bannack Montana; f/5.7; 1/400; Panasonic DMC-LZ8
2. Old Truck: October 20, 2011, 5:53pm; Bannack Montana; f/4.0; 1/320; Panasonic DMC-LZ8
3. Old town: October 20, 2011, 3:49; Bannack Montana; f/4.0; 1/400; Panasonic DMC-LZ8
On both pictures I used a tripod to take the shots, the first one I blended three pictures together using photomatix. I had a hard time getting the sky to look how I wanted it too. I finally took it into Photoshop and adjusted things there. I sharpened it, and adjusted the levels, I also made the background a little less sharp then the school house. For the truck I didn't do much editing in Photoshop, I adjusted the vibrancy to make the truck have brighter coloring, and masked it out of the rest of the picture. I also sharpened the truck a little.
Week 6, Macro Abstract
1. Organ: Oct. 20, 2011, 2:31; Bannack Montana; f/3.3; 1/8; Panasonic DMC-LZ8
2. Tree Bark: Oct. 20, 2011, 2:23; Bannack Montana; f/3.3; 1/100; Panasonic DMC-LZ8
For the first shot I wanted a cool key shot, so I got really close and took a couple of shots with a low f stop. In Photoshop I adjusted the levels, and I adjusted the vibrancy to make the colors show more. I masked out certain areas that I wanted either lighter or darker, I also made it sepia, and lowered the opacity of the layer so there was still color in it. I made it black and white as well, and lowered the opacity quite a lot so there was only a hint of it left.
The tree picture I just took kinda fast, trying to get a good texture shot. In Photoshop I adjusted the vibrancy to make the yellow show more, and I adjusted the levels. Then I blended the two pictures together and reduced the opacity of the texture shot so it would only show a little.
Week 6, Reverse shallow depth
1. Barb wire: October 20, 2011, 4:04pm; Bannack Montana; f/ 3.3; 1/1000; Panasonic DMC-LZ8
2. Old can: October 20, 2011, 4:05; Bannack Montana; f/3.3; 1/640; Panasonic DMC-LZ8
The first picture I took focusing it one the barb that was up close, so the background would be blurred. In Photoshop I adjusted the levels a little. The second picture I took focusing on the can in the background, so it would be in focus. In Photoshop all I did was adjust the levels a little.
week 6, action blurr
1. Jumping: October 20, 2011, 1:04pm; Bannack Montana; f/7.1; 1/640 sec; Panasonic DMC-LZ8
2. Ghost: October 20, 2011, 12:32pm; Bannack Montana; f/3.3; 3.2 sec; Panasonic DMC-LZ8
I didn't do any editing on the first picture, when I took it I made sure the shutter speed was pretty high, then took the shot right as she jumped. On the second picture I used a really slow shutter speed, it a dark room. I had her stand still for about one second and then move, as I was taking the shot. The only editing I did on this one was to make it black and white.
Week 6, Portraits
1. Hope: October 20, 2011, 12:48; Bannack Montana; f/3.3; 1/15; Panasonic DMC-LZ8
2. Green chair: Oct. 20, 2011, 3:18; Bannack Montana; f/4.9; 1/20; Panasonic DMC-LZ8
For the first picture I took it standing by the window so the light wouldn't be shining right into the camera, but would still be shining on her. In Photoshop I did basic air brushing, eye sharpening and I tried something new this time, I used an empty layer to add a little blush and eye shadow. I brought the vibrancy way up so you could see the wall is actually yellow, then I masked it out over her so she wouldn't have crazy coloring. I also adjusted the levels a little.
For the second picture I liked the lighting on her, but it was really blown out behind her, so I did a color match, and then masked it out around her so the background would be darker, but she would stay the same. I did some air brushing and did the empty layer with blush and eyeshadow again. I lightened her hair by changing the picture to screen, then masking out everything but a little pit of her hair.
Monday, October 17, 2011
Enhancements
1. Hannah: October 14, 2011, 6:29pm; Rexburg ID; f/8, 1/13; Panasonic DMC-LZ8
2. Hannah sister: October 1, 2011, 11:45am; Salt Lake City UT; f/7.1; 1/200; Panasonic DMC-LZ8
3. Walking; October 1, 2011; 11:31; SLC UT; f/3.3; 1/1000; Panasonic DMC-LZ8
The first picture is the color match one, I used another picture that I took in the same place, only the exposure was better. I lightened it up a little after I changed the color. I also sharpened it and did a little air brushing.
The second picture was really dark at first, but I really liked it, I used the adjustment brush in camera raw to lighten up around the girl, I think I might have gone a little to far and made it look a little unnatural but I didn't realize this till I finished with all the editing and looked at the picture as a whole. After I lightened it up I went to photo shop and started brushing up her skin. She has really nice skin naturally but because I did so much lighting it was a little green and fuzzy looking. so I adjusted the color till I thought it looked good. I sharpened her eyes, and added a little lighter color to her hair. I also added a blurred background and then masked her out.
The last picture all I really did was select the shirt and replace the color. I did a little adjusting of the levels, and sharpened it a little as well.
Portraits
Group posed
Before
After
Individual side
Before
After
individual head and shoulders
Before
After
Individual standing
Before
After
Group activity
Before
After
Work
Before
After
1. Dad and Elizabeth: October 1, 2011, 11:30am; Salt Lake city UT; f/8; 1/200; Panasonic DMC-LZ8
2. Hannah roommate: October 14, 2011, 6:29pm; Rexburg ID; f/3.3; 1/200; Panasonic DMC-LZ8
3. Joseph: October 1, 2011, 12:03; Salt Lake City UT; f/3.3; 1/1000; Panasonic DMC-LZ8
4. Hannah standing: October 14, 2011, 6:32pm; Rexburg ID; f/3.3; 1/160; Panasonic DMC-LZ8
5. Pumpkin carving: October 10, 2011, 8:17pm; American Manor, Rexburg ID; f/5.6; 1/8; Panasonic DMC-LZ8
6. Justin Pugmir: October 14, 2011, 9:30pm; Sammy's, Rexburg ID; f/2.8; 1/45; Samsung Techwin KENOX S860
The first shot I started by using an adjustment brush in camera raw and lightened up around the people. Then I took it into photo shop and did some air brushing. I started with the skin, then went on to sharpen their eyes and teeth, I adjusted the girl's eye brows a little as well. I used the liquefy tool a tiny bit to widen their eyes a little and to make the girl's hair look a little fluffier.
The second shot I adjusted the lighting a little, mostly in the sky to make it darker. I did some basic air brushing on her skin and sharpened her eyes. I also cropped the picture a little and added a bit of a blur in the background.
The rest of the pictures I did about the same kind of editing as the first two, except for the pumpkin carving one. This picture had really bad lighting so I tried a match color with a picture with better lighting. it turned out okay, but it looked a little unnatural so I desaturated it a little then added some of the color back in. I added all of the color back in on the pumpkin so it would be brighter.
Subscribe to:
Posts (Atom)